Real-Time Visual Synth Driven by RP2350
RP2350 is the dual-core microcontroller at the heart of Raspberry Pi Pico 2 boards. Although the RP2350 has two identical Arm Cortex-M33 cores, it is usually programmed in an asymmetric multiprocessing (AMP) style, which doesn’t provide a shared task scheduler (e.g. a la FreeRTOS SMP). It’s still simple to divide and pin different tasks onto either core and use the two fast hardware FIFOs for inter-core communications.
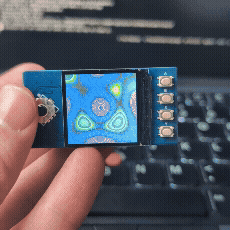
Recently, I acquired a 1.3” 240x240 LCD made especially for Raspberry Pi Picos. It can be attached directly to the board pins, where the command and data signals are sent to its ST7789VW control chip via SPI and the joystick and 4 button inputs are received via 9 GPIO pins. This provided a chance to test how far I can push the microcontroller in creating a real-time visual synthesizer.
With help from generative AI, I created a “plasma effect”, which is generated by combining several sine waves over a 2D grid and animating them over time. The rendering happens using a single frame buffer. For each pixel, its coordinates and distance from the center are fed into sine functions, and the results are added up to create smooth interference patterns. A time parameter continuously shifts the phases of these waves, making the pattern flow and evolve. Another phase offset is used to cycle through colours for an extra ethereal feel. I programmed the joystick to shift the colour phase and change the animation speed, and the 4 buttons to switch between 4 presets for plasma parameters.
You can find the source code in this standalone repo or in my collection of Pico projects. The LCD vendor provides a C SDK shared between multiple products. I extracted the part specific to my display and changed it to use a 240x240 frame buffer for rendering, before sending every frame to the display.
At first, I used a single core to render each frame in memory and then send the entire frame via blocking SPI. The rendering uses floating point calculations, which are expensive, even with RP2350’s single-precision FPU. I didn’t make any attempts at optimizing the rendering code itself (except creating a sine look-up table upfront), as I was curious how much faster/smoother the animation can get if the tasks of rendering and driving the display are divided between the two cores. The rendering represents any CPU-heavy graphical calculations.
The single-core demo got me to a measly 3.3 FPS, which is too choppy and unacceptable even to a non-gamer! I then separated rendering and writing into the display to run in parallel between the two cores. Once the frame is ready, the renderer sends a signal to the display core to shovel the data out. Typically, writing into and reading from the same frame buffer could create “tearing” glitches, but with the relatively slow-moving and flowy animation, it wasn’t an issue. The dual-core demo reached 5.5 FPS, which feels more like an animation even if it’s still choppy.
To further play around with my Pico, I could be using Direct Memory Access (DMA) or Pico’s unique Programmable I/O (PIO) to speed up the display driver. Currently, the renderer is much slower than the driver (equivalent to 8.5 FPS), so even using CPU-free solutions to move pixels won’t be enough to speed up the animation. Perhaps splitting the rendering into the 2 cores to run in parallel could help, but we’re then gradually getting into why GPUs exist in the first place!