Blog
Raspberry Pi Pico as AM Radio Transmitter
Obligatory legalese: emitting radio waves, even low-powered and/or short-lived may not be permitted in your jurisdiction.
Years ago, people figured out Raspberry Pi’s can accidentally double as FM radio transmitters without a need for any radio front-end (if we don’t count a single jumper wire working as an antenna). They achieved this by tying a GPIO pin to a software-controlled clock around 100 MHz to modulate audio. This created a low-powered FM radio transmitter. Due to the pin producing a square wave instead of a neat sine wave, it also emitted weaker harmonics at 300MHz, 500MHz, etc., but any basic FM radio could pick up the audio. I wondered if a similar feat could be achieved by much less powerful Raspberry Pi Pico microcontrollers.
While a Pico board doesn’t have the same architecture that allows FM transmission on regular Pi boards, it has a unique feature: PIO. This allows running programs based on a minimal instruction set independent of the CPU at the system clock rate. A simple program (“turn the pin ON, turn the pin OFF”) can then produce a square wave at half the system clock rate. Pico boards could be overclocked at ~200 MHz, allowing a similar carrier frequency, but the exact frequency cannot be controlled by software in any practical way. This rules out clean FM.
A Pico board can however allow better control at lower frequencies within the typical AM radio station (~1000 KHz). While square waves are well-suited for frequency-modulating any PCM audio file (ignoring the unwanted harmonics), they cannot be used well for amplitude modulation. They can only encode ON or OFF instead of different audio amplitudes (think 1-bit envelope). Alright, no emitting arbitrary “.wav” files. We can at least emit a single audio frequency at a time using On-Off Keying. Let’s make some retro game sounds!
With assistance from LLMs, I wrote this code that emits the Shave and A Haircut melody on a 1000 KHz carrier. Here’s a basic AM radio picking up the audio:
One of the pins is programmed to produce a constant 1000 KHz square wave using PIO. The main program then turns the PIO on and off at the intended frequency. e.g. to emit an A4 pitch (440 Hz), it turns the 1000 KHz square wave on and off 440 times a second. To the radio receiver, this means a 440 Hz square wave audio. Using this technique, it emits the well-known Shave and A Haircut melody on a loop.
Real-Time Visual Synth Driven by RP2350
RP2350 is the dual-core microcontroller at the heart of Raspberry Pi Pico 2 boards. Although the RP2350 has two identical Arm Cortex-M33 cores, it is usually programmed in an asymmetric multiprocessing (AMP) style, which doesn’t provide a shared task scheduler (e.g. a la FreeRTOS SMP). It’s still simple to divide and pin different tasks onto either core and use the two fast hardware FIFOs for inter-core communications.
Recently, I acquired a 1.3” 240x240 LCD made especially for Raspberry Pi Picos. It can be attached directly to the board pins, where the command and data signals are sent to its ST7789VW control chip via SPI and the joystick and 4 button inputs are received via 9 GPIO pins. This provided a chance to test how far I can push the microcontroller in creating a real-time visual synthesizer.
With help from generative AI, I created a “plasma effect”, which is generated by combining several sine waves over a 2D grid and animating them over time. The rendering happens using a single frame buffer. For each pixel, its coordinates and distance from the center are fed into sine functions, and the results are added up to create smooth interference patterns. A time parameter continuously shifts the phases of these waves, making the pattern flow and evolve. Another phase offset is used to cycle through colours for an extra ethereal feel. I programmed the joystick to shift the colour phase and change the animation speed, and the 4 buttons to switch between 4 presets for plasma parameters.
You can find the source code in this standalone repo or in my collection of Pico projects. The LCD vendor provides a C SDK shared between multiple products. I extracted the part specific to my display and changed it to use a 240x240 frame buffer for rendering, before sending every frame to the display.
At first, I used a single core to render each frame in memory and then send the entire frame via blocking SPI. The rendering uses floating point calculations, which are expensive, even with RP2350’s single-precision FPU. I didn’t make any attempts at optimizing the rendering code itself (except creating a sine look-up table upfront), as I was curious how much faster/smoother the animation can get if the tasks of rendering and driving the display are divided between the two cores. The rendering represents any CPU-heavy graphical calculations.
The single-core demo got me to a measly 3.3 FPS, which is too choppy and unacceptable even to a non-gamer! I then separated rendering and writing into the display to run in parallel between the two cores. Once the frame is ready, the renderer sends a signal to the display core to shovel the data out. Typically, writing into and reading from the same frame buffer could create “tearing” glitches, but with the relatively slow-moving and flowy animation, it wasn’t an issue. The dual-core demo reached 5.5 FPS, which feels more like an animation even if it’s still choppy.
To further play around with my Pico, I could be using Direct Memory Access (DMA) or Pico’s unique Programmable I/O (PIO) to speed up the display driver. Currently, the renderer is much slower than the driver (equivalent to 8.5 FPS), so even using CPU-free solutions to move pixels won’t be enough to speed up the animation. Perhaps splitting the rendering into the 2 cores to run in parallel could help, but we’re then gradually getting into why GPUs exist in the first place!
Sonar-Powered Creepy Halloween Ghost
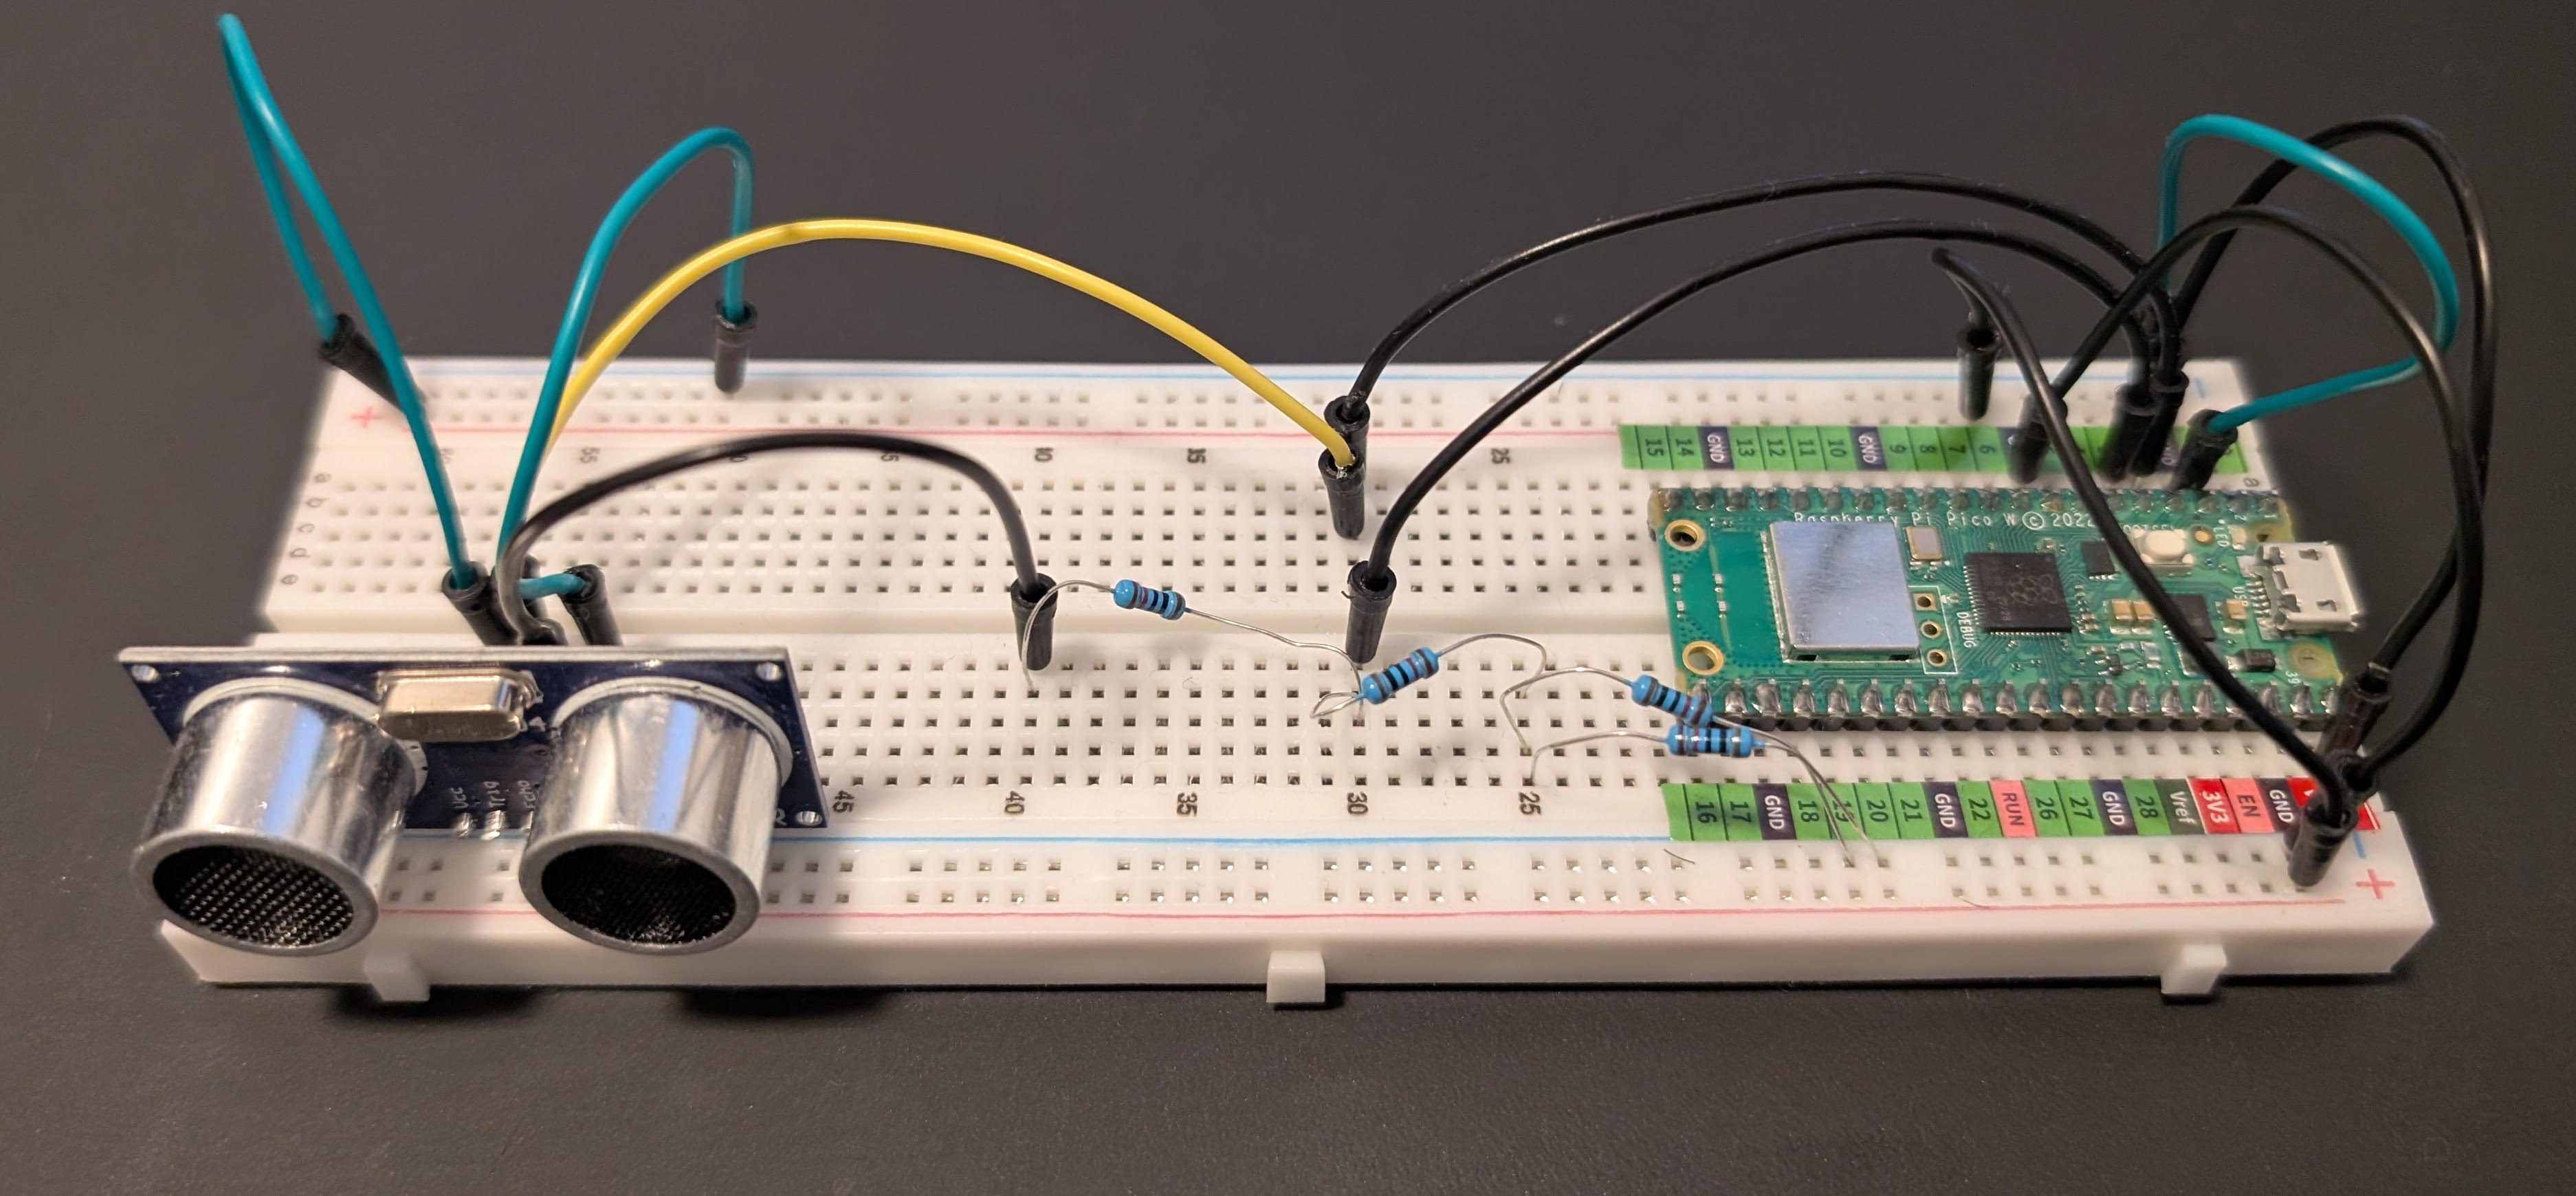
I recently bought a Raspberry Pi Pico W, which comes with a Bluetooth module, along with an HC-SR04 ultrasonic rangefinder. I wanted to hide it inside Halloween decorations and program it to make a creepy ghost sound that intensified as my child’s Halloween party guests approached it. The children might have already aged out of being scared by it, but it was a technical success after all. I’m sharing the source code and some of the details here.
The ultrasonic rangefinder works by emitting high-frequency sound pulses and measuring how long it takes the echos to return from nearby objects. The emission and measurement has to be manually driven by the microcontroller. The microcontroller’s job is to measure the distance regularly and if someone is standing within the range, produce a creepy ghost sound; a sine wave within 300-600 Hz with some extra low-frequency modulation to give it a “breathing” effect.
Circuitry
The rangefinder requires 5V and Ground that could be easily obtained from Pico’s VBUS and GND pins. Its TRIG pin, to drive wave emissions, can be controlled by a regular GPIO pin (GP2) as 3.3V is enough, but its ECHO pin outputs 5V. In order to prevent the rangefinder from frying the board by sending 5V into the receiving GPIO pin (GP3), I use a simple voltage divider using a 10K and a 15K ohm resistors. ECHO is separated from GP3 by 10k ohm, which is in turn pulled down to GND by 15k ohm. This brings down the voltage to about 3V, which reliably registers as high for a GPIO pin.
There isn’t anything else to the circuit besides powering the board via USB.
Source code
Instead of using the standard C/C++ SDK, I opted for Arduino-Pico v5.3.0. You can still program the board in C++ (Arduino styled), but it comes with a convenient Bluetooth driver and the IDE makes debugging via the serial port simpler. The source code contains all the logic in a single Arduino file.
The setup defines the I/O pins and makes a connection to the Bluetooth speaker as an A2DPSource. For connection to the Bluetooth speaker, I specified my speaker’s MAC address for reliability and simplicity. The main loop is in charge of driving the rangefinder and calculating and streaming the ghost sound, so to keep it tight and performant, I pre-calculate the sine function for 256 values (with linear interpolation between them) during the setup and store them in a look-up table.
The main loop polls the ultrasonic sensor by sending a 10-15 micro-second TRIG pulse and measuring how long the ECHO pin stays high. From this round-trip time, I compute the distance. The results are surprisingly accurate. If an object is within the range (15-150 cm), it starts generating a sine wave, whose frequency (300 to 900 Hz) and amplitude are a function of distance. This creates the illusion that the “ghost” is screaming harder as you get closer. As the pure sine wave can sound a bit artificial, I add a low-frequency oscillator to the mix. I maintain two separate phase accumulators; one for the main tone and one for the modulation, and read both from the lookup table. I apply smoothing and clamping functions to avoid clicks or harsh transitions. This is the part where generative AI and a few iterations helped me get the best results.
The audio output is then calculated at the sample rate of 48KHz. The left and right channels have the same value (mono) and I use a 2048-frame buffer for streaming the audio via Bluetooth. Raspberry Pi Pico is not exactly a high-performance microcontroller, but it could handle driving the sonar sensor and Bluetooth streaming in the same loop with occasional buffer underrun (resulting in clicks). To avoid that, the second core could be used to separate the sensing and streaming tasks, and ensuring the streaming takes priority over sensing (no major change in distance is expected anyway).
Serverless Photo-Sharing App Using Amazon Web Services
As the self-appointed IT director of my new family, I was tasked with finding the best solution to easily upload, back up, and share pictures and videos of our newborn daughter. While there are a myriad of cloud services that a normal person would go for, I didn’t want to rely on them to safeguard our most precious moments. To be honest, I was also itching to create a serverless app on AWS, without committing to much cost or maintenance overhead.
AWS has a host of relatively cheap services that makes creating small serverless apps easy. The JavaScript API allows you to keep most of the logic in your browser, where you can access AWS directly or through a proxy (e.g. API Gateway). I’ll explain how I used them:
-
Cognito for authentication: The main users of this app were my family and friends, so I only had to worry about unintended mistakes as opposed to malicious abuse. This allowed me to create pre-defined users for different roles (e.g. admin and visitor), and use Cognito to authenticate them. The JavaScript API lets you safely hard-code the public codes in the web page, and log in using a password only.
-
IAM for authorization: Once users are authenticated, IAM should give them minimal privileges to do their tasks. For example, I gave file upload access to admin users, but only read access to visitors. The Principle of Least Privilege prevents users from wreaking havoc. IAM didn’t have the finest-grained access levels, but for a trusted set of users, that should be good enough. For more flexibility in authorization, of course, it has to be done on a proxy or web server.
-
S3 for storage: Amazon’s simple storage is truly simple to use. I used it to store media files, thumbnails, and the static website assets. You may make the static site public, but put media files behind Cognito. The nice thing about S3+Cognito is that you can use the Cognito token in the S3 URL and access it in your website as you normally would with hosted images.
-
DynamoDB for database: The list of galleries and files, timestamps, captions, user access, and comments have to be stored somewhere. While S3 provides limited ability to store metadata for each file, the permanently-free tier of DynamoDB has enough capacity to store them in a few tables. The NoSQL (or rather schemaless) nature of the database makes it easy to quickly add new features.
-
Lambda for processing: A serverless architecture will not be complete without a function-as-a-service component! In this case, I used a S3-triggered function to create an entry in the database and process newly-uploaded images and videos. It could do anything as simple as generating thumbnails (Lambda is pre-packed with ImageMagick), or dealing with EXIF idiosyncrasies.
As for front-end, there wasn’t much needed for this app. Besides the good ol’ AWS JavaScript API, I used Bootstrap for easy styling, Knockout for two-way data binding, and Unite Gallery for media viewer. Unite Gallery is an open-source library with a few available themes and easy setup. However, getting videos to play on mobile and JPEG EXIF orientation proved to be challenging.
If I found time to improve the app, these areas would come up next:
-
CloudFormation: As of now, most of the configuration has been manually done and its persistence is at the mercy of AWS. I can use CloudFormation to formulate how everything was set up, so it can be retrieved if anything goes wrong. Amazon provides CloudFormer to create a template from an existing architecture, but it didn’t cover the bulk of my configuration around Cognito and security policies.
-
Automatic rotation: not all browsers can show the right orientation of cellphone images based on their metadata. I can use a Lambda function to automatically rotate images based on their EXIF orientation field.
-
API Gateway: Using the combination of API Gateway and Lambda, there would be no need to give users direct access to AWS resources. This will improve the security and may make the app useful for other people who can have a more serious use case for it.
-
Backup: A scheduled task that backs up media files and database records and writes them onto cheaper storage (e.g. AWS Glacier). For a more paranoid approach, I can also store them on another cloud service provider such as Google Cloud.
I’d be happy to get feedback on the design, and ways to improve the architecture.
Chilkoot Trail: The World's Longest Museum
Chilkoot Trail, a 53-km trail from Dyea, Alaska to Bennett, BC, was the main way for gold rush prospectors in late 1890s to get to Klondike River in Yukon. This slideshow contains photos of my 5-day hike through this historic trail.
Slideshow plugin by Pixedelic.
If you liked this, you may also like my Iceland Trip post.